
In my previous post in this series, we installed Windows Terminal, Ubuntu 24.04 on WSL, and then configured the WSL settings. So, now that the Ubuntu instance is ready to go, this post is going to walk you through installing my favorite Linux-based Large Language Model (LLM) engine (named “Ollama”), then Docker, and a front-end named Open WebUI.
At a high-level, this is going to be a three-part installation:
- Ollama – A Linux-based open-source LLM engine that allows you to download and run models on your local machine.
- Docker – A platform that allows developers to package applications and dependencies into a single self-contained object called a “container”.
- Open WebUI – A user-friendly web front-end that allows you to interact with LLMs running in Ollama.
Part of the reasoning we configured WSL to keep running in the background in the last blog post, is to have an LLM at-the-ready to ask questions at any given moment. With Ollama serving up LLMs to Open WebUI (running within a Docker container), this allows us to create a bookmark in a web browser for instant access.
Side note: The thing I enjoy most about this setup, is that it becomes a valuable “researching tool” in your toolbox. For example, you can use Llama 3.x for general queries, deepseek-coder-v2 to answer programming questions (it knows 338 languages!), or even an uncensored model like dolphin-mixtral to help you write that murder-mystery novel. For me personally, while I am good with Linux, I admit I am not an all-knowing guru, so I like that it can help answer questions about command syntax and other tasks I don’t do every day.
Installing Ollama
Installing Ollama is very straightforward because it has an installation script that can be run from your Ubuntu bash prompt (running in Windows Terminal).
dschmitz@SLY:~$ curl -fsSL https://ollama.com/install.sh | sh
>>> Installing ollama to /usr/local
[sudo] password for dschmitz:
>>> Downloading Linux amd64 bundle
######################################################################## 100.0%
######################################################################## 100.0%
>>> Creating ollama user...
>>> Adding ollama user to render group...
>>> Adding ollama user to video group...
>>> Adding current user to ollama group...
>>> Creating ollama systemd service...
>>> Enabling and starting ollama service...
Created symlink /etc/systemd/system/default.target.wants/ollama.service → /etc/systemd/system/ollama.service.
>>> Nvidia GPU detected.
>>> The Ollama API is now available at 127.0.0.1:11434.
>>> Install complete. Run "ollama" from the command line.
dschmitz@SLY:~$
The most convenient aspect of installing Ollama via the install script (instead of manually) is that it is automatically set to run as a service. After all, this was one of the main reasons we previously configured WSL to run systemd. If you would like to double-check its service status, you can use the systemctl command:
dschmitz@SLY:~$ systemctl list-unit-files --type=service |grep ollama
ollama.service                               enabled         enabled

dschmitz@SLY:~$ systemctl status -n0 ollama
● ollama.service - Ollama Service
     Loaded: loaded (/etc/systemd/system/ollama.service; enabled; preset: enabled)
     Active: active (running) since Fri 2024-09-27 03:35:22 CDT; 10h ago
   Main PID: 176 (ollama)
      Tasks: 49 (limit: 19134)
     Memory: 1.8G ()
     CGroup: /system.slice/ollama.service
             ├─  176 /usr/local/bin/ollama serve
             └─24276 /tmp/ollama3094940036/runners/cuda_v12/ollama_llama_server --model /usr/share/ollama/.>
dschmitz@SLY:~$
With Ollama installed, now we can take a minute to look at the command line help options to get more information about its usage:
dschmitz@SLY:~$ ollama --help
Large language model runner

Usage:
  ollama [flags]
  ollama [command]

Available Commands:
  serve       Start ollama
  create      Create a model from a Modelfile
  show        Show information for a model
  run         Run a model
  stop        Stop a running model
  pull        Pull a model from a registry
  push        Push a model to a registry
  list        List models
  ps          List running models
  cp          Copy a model
  rm          Remove a model
  help        Help about any command

Flags:
  -h, --help      help for ollama
  -v, --version   Show version information

Use "ollama [command] --help" for more information about a command.
dschmitz@SLY:~$

dschmitz@SLY:/etc/systemd/system$ ollama ps
NAME    ID    SIZE    PROCESSOR    UNTIL
dschmitz@SLY:/etc/systemd/system$ ollama list
NAME    ID    SIZE    MODIFIED
dschmitz@SLY:/etc/systemd/system$
However, at this point in the process, if you try the ps or list command (see above), it will return nothing, because remember that Ollama is just the engine, and it still needs a model to run.
Finding and Downloading a Model
Unlike with LM Studio, since Ollama is running in Ubuntu, there is no fancy user interface to browse, select, and download models. (Since my instance of WSL doesn’t run a desktop environment [like GNOME], Ollama is simply accessed from the bash shell prompt.) Matter of fact, if you go looking for a way to browse available models, Ollama doesn’t even have an option. In other words, until we install Open WebUI later in this tutorial, there are some manual steps required.
The easiest way to find a model is just to visit the Ollama library web page. This page can help you select a model, then displays the various file sizes to pick which quantized version will work best with your local GPU hardware.
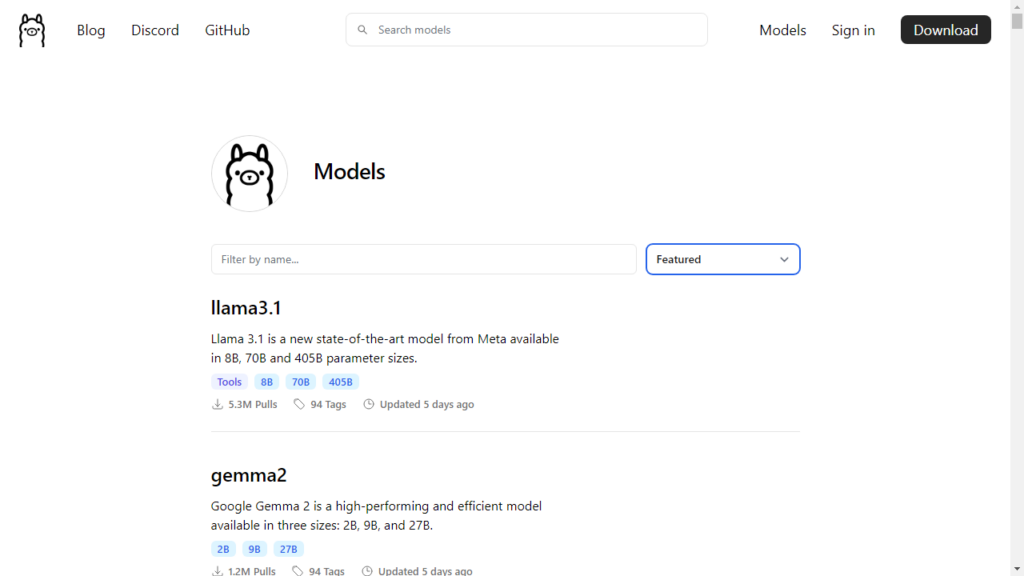
If you click into a model, it will give you the information you need to know about it.
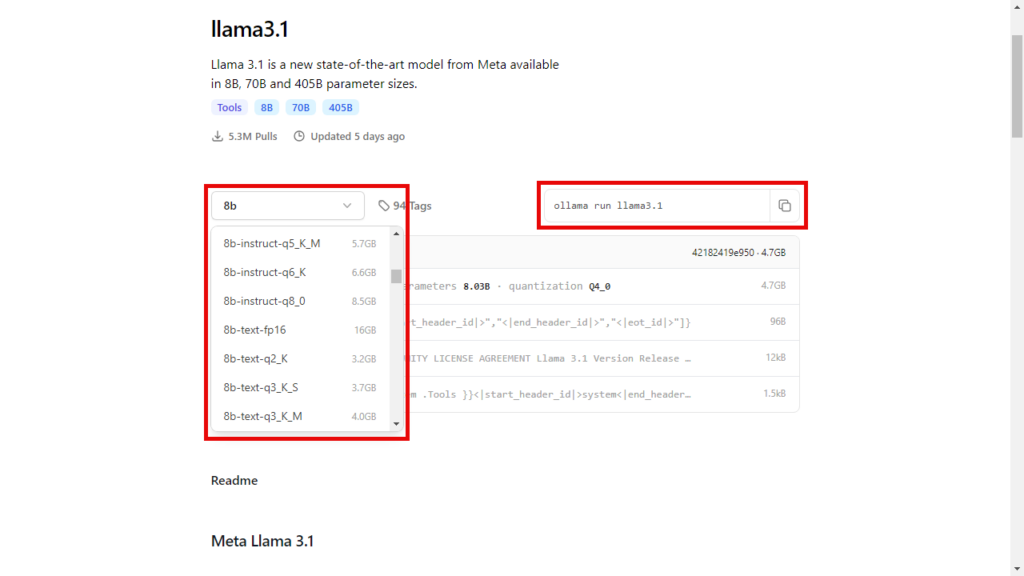
If you click the model parameters, and then View more, you can see all the different quantized versions that are available. At this point you may be wondering what are “instruct” models versus “text” models?
With the two different types, there are some key differences:
- Instruct models: Fine-tuned to follow explicit user instructions and perform tasks more accurately.
- Text models: General-purpose, used for open-ended text generation and conversational tasks but may not follow instructions as strictly.
In summary, instruct models prioritize accuracy and goal completion, whereas text models emphasize fluency, creativity, and handling a broader range of language tasks. For example, if you are using the model to help with creative writing, then perhaps the text model may suit your needs better.
Once you select a model that will fit within the available VRAM of your video card (or RAM of your system), you can copy the Ollama command from the box on the upper right.
Tip: Even though your video card may have 16 GB of VRAM, some of that memory is already being used to run your monitor(s). It is best to go into the Performance tab of Task Manager to see how much is available before deciding which sized quant to download.
With download command copied, we can return to the bash shell prompt to get it started.
dschmitz@SLY:~$ ollama run llama3.1
pulling manifest
pulling 8eeb52dfb3bb... 100% ▕############################################▏ 4.7 GB
pulling 948af2743fc7... 100% ▕############################################▏ 1.5 KB
pulling 0ba8f0e314b4... 100% ▕############################################▏  12 KB
pulling 56bb8bd477a5... 100% ▕############################################▏   96 B
pulling 1a4c3c319823... 100% ▕############################################▏  485 B
verifying sha256 digest
writing manifest
success
>>> Send a message (/? for help)Note: Ollama stores the models in /usr/share/ollama/.ollama/models/
One thing to point out is that you can either run or pull a model. If you use the run command, after it is done downloading it will load the model into memory and let you start asking questions from the command prompt. However, if you use the pull command, it will simply just download the model.
From the Ollama prompt “>>>”, you can ask it a question, use /? For help, or type /bye to exit.
>>> Help me brainstorm a 9 day trip to Ireland. What are the most popular attractions?
Ireland is a fantastic destination, and I'd be happy to help you plan your 9-day trip.

Here are some of the most popular attractions in Ireland:

**Top Cities:**

1. **Dublin**: Visit Trinity College to see the Book of Kells, Guinness Storehouse ( brewery and beer hall), Kilmainham Gaol (former prison turned museum), and Temple Bar (vibrant nightlife area).
2. **Galway**: Explore the Latin Quarter, visit the Galway Cathedral, and enjoy traditional Irish music sessions.
3. **Kilkenny**: Discover Kilkenny Castle, St. Canice's Cathedral, and the National Craft Gallery.

**Must-see Landmarks:**

1. **Cliffs of Moher** (County Clare): Breathtaking coastal cliffs with stunning views.
2. **Ring of Kerry** (County Kerry): Scenic drive through rolling hills, lakes, and villages.
3. **Giants Causeway** (County Antrim - Northern Ireland's part of the island, but easily accessible
from Ireland): Natural rock formations shaped by volcanic activity.
4. **Blarney Castle** (County Cork): Visit the famous Blarney Stone, gardens, and a beautiful lakeside
setting.
...
>>> /bye
dschmitz@SLY:~$
Installing Docker
In my experience, installing Open WebUI is easiest as a Docker container, so much like there was with Ollama, there is an installation script that installs Docker for you too.
dschmitz@SLY:~$ curl -fsSL https://get.docker.com -o get-docker.sh
dschmitz@SLY:~$ sudo sh get-docker.sh
[sudo] password for dschmitz:
# Executing docker install script, commit: 39040d838e8bcc48c23a0cc4117475dd15189976

WSL DETECTED: We recommend using Docker Desktop for Windows.
Please get Docker Desktop from https://www.docker.com/products/docker-desktop/


You may press Ctrl+C now to abort this script.
+ sleep 20
+ sh -c apt-get -qq update >/dev/null
+ sh -c DEBIAN_FRONTEND=noninteractive apt-get -y -qq install ca-certificates curl >/dev/null
+ sh -c install -m 0755 -d /etc/apt/keyrings
+ sh -c curl -fsSL "https://download.docker.com/linux/ubuntu/gpg" -o /etc/apt/keyrings/docker.asc
+ sh -c chmod a+r /etc/apt/keyrings/docker.asc
+ sh -c echo "deb [arch=amd64 signed-by=/etc/apt/keyrings/docker.asc] https://download.docker.com/linux/ubuntu noble stable" > /etc/apt/sources.list.d/docker.list
+ sh -c apt-get -qq update >/dev/null
+ sh -c DEBIAN_FRONTEND=noninteractive apt-get -y -qq install docker-ce docker-ce-cli containerd.io docker-compose-plugin docker-ce-rootless-extras docker-buildx-plugin >/dev/null
+ sh -c docker version
Client: Docker Engine - Community
 Version:           27.3.1
 API version:       1.47
 Go version:        go1.22.7
 Git commit:        ce12230
 Built:             Fri Sep 20 11:40:59 2024
 OS/Arch:           linux/amd64
 Context:           default

Server: Docker Engine - Community
 Engine:
  Version:          27.3.1
  API version:      1.47 (minimum version 1.24)
  Go version:       go1.22.7
  Git commit:       41ca978
  Built:            Fri Sep 20 11:40:59 2024
  OS/Arch:          linux/amd64
  Experimental:     false
 containerd:
  Version:          1.7.22
  GitCommit:        7f7fdf5fed64eb6a7caf99b3e12efcf9d60e311c
 runc:
  Version:          1.1.14
  GitCommit:        v1.1.14-0-g2c9f560
 docker-init:
  Version:          0.19.0
  GitCommit:        de40ad0

================================================================================

To run Docker as a non-privileged user, consider setting up the
Docker daemon in rootless mode for your user:

    dockerd-rootless-setuptool.sh install

Visit https://docs.docker.com/go/rootless/ to learn about rootless mode.


To run the Docker daemon as a fully privileged service, but granting non-root
users access, refer to https://docs.docker.com/go/daemon-access/

WARNING: Access to the remote API on a privileged Docker daemon is equivalent
         to root access on the host. Refer to the 'Docker daemon attack surface'
         documentation for details: https://docs.docker.com/go/attack-surface/

================================================================================
If you were paying attention to the text scrolling by during the install, you will see a 20-second pause with a warning that says, “WSL DETECTED: We recommend using Docker Desktop for Windows.” While Docker Desktop integrates with WSL nicely, I gave up and uninstalled it because it was wreaking havoc with my WSL backups.
You see, every night, I have a pre-backup script that stops my WSL instance before exporting it and transferring it to my backup server. Any time WSL is stops, Docker Desktop dies too, and an error message asking to restart it pops up on the screen. With no quick and obvious solution for an automatic restart, I just didn’t have the energy to re-write my pre and post backup scripts. That is why I chose to install Docker directly into WSL, because this means that it will start and stop with Ubuntu (and not independently).
Regardless, putting my personal backup grievances aside, in my mind there is one good reason to install Docker Desktop. That is if you have Docker containers that you need to run in both Windows and Linux. The caveat with Docker Desktop is that you can only run containers on Windows or Linux, but not at the same time. To do that, you need to install Docker within the WSL instance anyways.
Tip: When Docker is done installing, I find it helpful to add your account to the docker user group so that you can run the commands without privilege escalation.
dschmitz@SLY:~$ sudo usermod -aG docker dschmitz
dschmitz@SLY:~$
Finally, before moving onto the Open WebUI install, it is a good idea to test to make sure Docker is working correctly. Personally, I like to check the version and run the hello-world container to ensure everything is operating nominally.
dschmitz@SLY:~$ docker -v
Docker version 27.3.1, build ce12230

dschmitz@SLY:~$ docker run hello-world
Unable to find image 'hello-world:latest' locally
latest: Pulling from library/hello-world
c1ec31eb5944: Pull complete
Digest: sha256:91fb4b041da273d5a3273b6d587d62d518300a6ad268b28628f74997b93171b2
Status: Downloaded newer image for hello-world:latest

Hello from Docker!
This message shows that your installation appears to be working correctly.

To generate this message, Docker took the following steps:
 1. The Docker client contacted the Docker daemon.
 2. The Docker daemon pulled the "hello-world" image from the Docker Hub.
    (amd64)
 3. The Docker daemon created a new container from that image which runs the
    executable that produces the output you are currently reading.
 4. The Docker daemon streamed that output to the Docker client, which sent it
    to your terminal.

To try something more ambitious, you can run an Ubuntu container with:
 $ docker run -it ubuntu bash

Share images, automate workflows, and more with a free Docker ID:
 https://hub.docker.com/

For more examples and ideas, visit:
 https://docs.docker.com/get-started/

dschmitz@SLY:~$ docker ps -a
CONTAINER ID   IMAGE                                COMMAND           CREATED          STATUS
  PORTS     NAMES
91d2b2c9dd2d   hello-world                          "/hello"          39 seconds ago   Exited (0) 39 seconds ago             hopeful_banzai
dschmitz@SLY:~$ docker rm 91d2b2c9dd2d
91d2b2c9dd2d
dschmitz@SLY:~$ docker images
REPOSITORY                      TAG       IMAGE ID       CREATED         SIZE
hello-world                     latest    d2c94e258dcb   17 months ago   13.3kB
dschmitz@SLY:~$ docker rmi hello-world
Untagged: hello-world:latest
Untagged: hello-world@sha256:91fb4b041da273d5a3273b6d587d62d518300a6ad268b28628f74997b93171b2
Deleted: sha256:d2c94e258dcb3c5ac2798d32e1249e42ef01cba4841c2234249495f87264ac5a
Deleted: sha256:ac28800ec8bb38d5c35b49d45a6ac4777544941199075dff8c4eb63e093aa81e
dschmitz@SLY:~$
To keep everything nice and tidy after testing, the latter commands remove the hello-world container and image.
Installing Open WebUI
We have finally made it to the last piece of the puzzle. If you follow their the default commands for installing the Open WebUI container, they likely won’t work with WSL, so as per their suggestion, I had to use the network=host option. The full installation command I used looked like this:
dschmitz@SLY:~$ docker run -d --network=host -v open-webui:/app/backend/data -e OLLAMA_BASE_URL=http://127.0.0.1:11434 --name open-webui --restart always ghcr.io/open-webui/open-webui:main
Unable to find image 'ghcr.io/open-webui/open-webui:main' locally
main: Pulling from open-webui/open-webui
a2318d6c47ec: Pull complete
40d734479f14: Pull complete
0b61b7b259eb: Pull complete
081a3493c0e7: Pull complete
e8027c27b65b: Pull complete
4f4fb700ef54: Pull complete
a211859e0845: Pull complete
3b28612a0571: Pull complete
cdf3f759b3fe: Pull complete
e2cb5effded8: Pull complete
a82fd01812e6: Pull complete
643069e1d998: Pull complete
fcbd210b77d6: Pull complete
3b45dcde4fe9: Pull complete
c33697678b06: Pull complete
Digest: sha256:2837600206aa64bc5a4e92cafe53e61a96a12a6366f88169e76f9e7118ee51a6
Status: Downloaded newer image for ghcr.io/open-webui/open-webui:main
b647e9751837cefdceb949db77cf566de8d4e4ebe85b3bd0a4b794143452b355
dschmitz@SLY:~$
Configuring Open WebUI
With all the heavy lifting done, now we can start playing with Ollama through Open WebUI! The first step is just opening a browser to http://localhost:8080/. As I mentioned before, I created a bookmark for easy access.
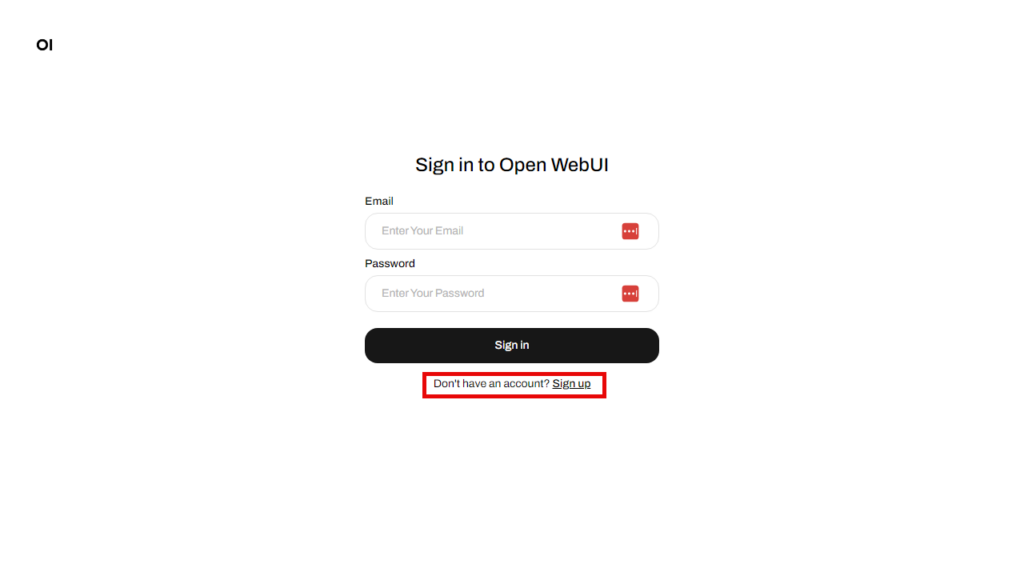
By default, Open WebUI is multi-user capable. Rest assured, when you sign up to create a username and password, it actually stores the information locally within the Docker container. (Unless some secret three-letter agency has somehow quietly infiltrated the GitHub source code, I am not aware of it transferring anything externally without permission.) The cool part about this feature is that if you eventually decide to reconfigure your WSL networking to share it with the rest of your household, your whole family can create their own accounts to ask it questions.
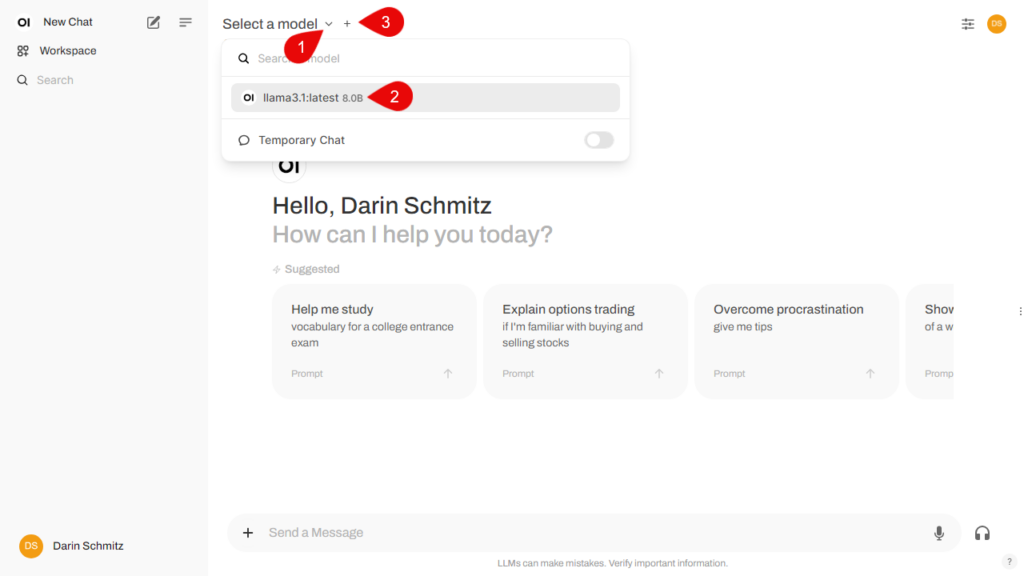
Once logged in for the first time, you need to select the model we downloaded previously (see below). Click the carrot (1), then select the model we downloaded (2). Click the Set as default to set this model as your default.
Side note: If you have more than one model downloaded (and enough VRAM/RAM available), you can click the + (3) to load multiple models into memory at once. When you send a message, it will display both answers side by side so that you can compare and contrast responses from each model.
Voila! You now have a personal chat interface that is very similar to paid commercial offerings from the foundational models, but all local, and without a monthly subscription cost.
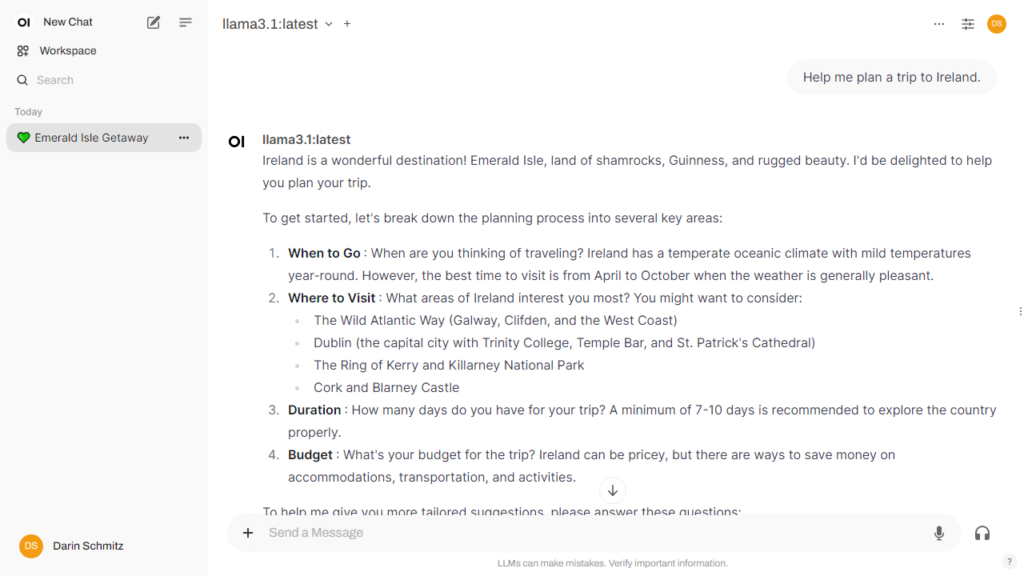
While you are playing around asking it questions, for best results, remember to click New Chat when switching subjects.
Open WebUI settings
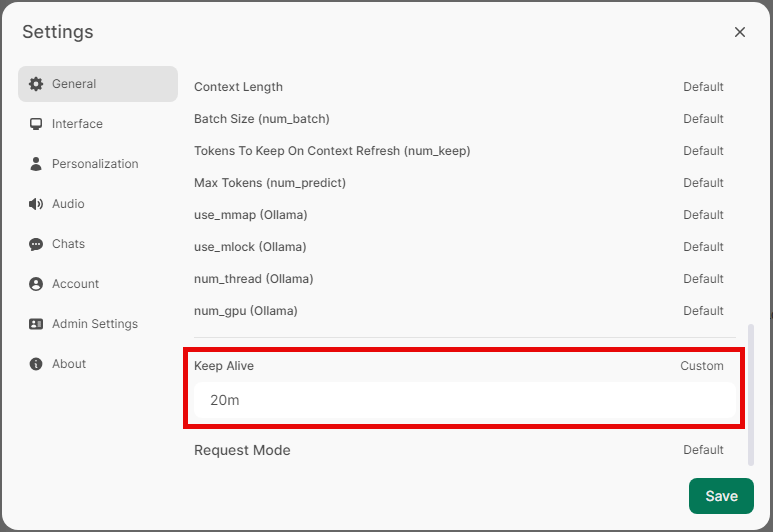
There are a couple of recommended settings and features that I want to call out to make the experience better. The first is the Keep Alive timeout. When you start a new chat, there is usually a few second delay as it loads the model into VRAM/RAM for the first time. By default, Open WebUI will keep that model in memory for 5 minutes before unloading it to save system resources. I personally have set mine to 20 minutes, so that it isn’t continuously loading and unloading the model during the longer pauses in my conversations.
To find this setting, you must click your account name in the lower left, select Settings, General, Advanced Parameters (show), scroll down and click on Keep Alive (Default) to set a custom value.
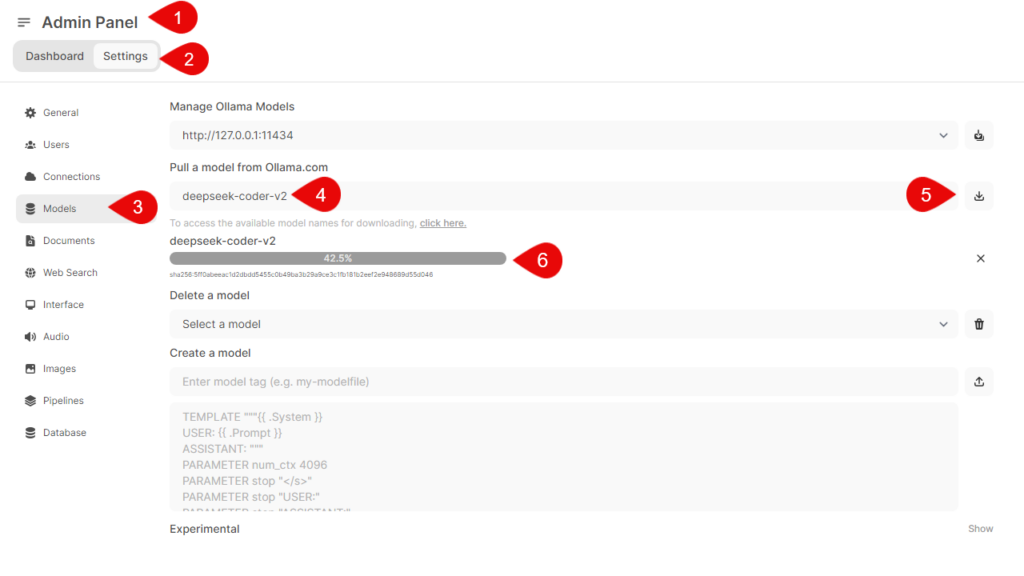
The second feature is the ability to download Ollama models directly from the Admin Panel, meaning you don’t have to execute the Ollama pull command from a bash prompt. Again, click your account name in the lower left, click Admin Panel (1), Settings (2), Models (3), then enter the name of the model from the Ollama Library that you want it to pull (4), then click the Download (5) button. The download status (6) should show how long it will take until the GGUF file is fully downloaded.
One final tip. From time to time, as models get updated, and you might want to refresh them with the latest versions. You can use the following bash command to automatically refresh all your models at once.
dschmitz@SLY:~$ ollama ls | awk 'NR>1 {print $1}' | xargs -I{} sh -c 'echo Pulling model: {}; ollama pull {}'
Pulling model: deepseek-coder-v2:latest
pulling manifest
pulling 5ff0abeeac1d... 100% ▕#############################################▏ 8.9 GB
pulling 22091531faf0... 100% ▕#############################################▏  705 B
pulling 4bb71764481f... 100% ▕#############################################▏  13 KB
pulling 1c8f573e830c... 100% ▕#############################################▏ 1.1 KB
pulling 19f2fb9e8bc6... 100% ▕#############################################▏   32 B
pulling 34488e453cfe... 100% ▕#############################################▏  568 B
verifying sha256 digest
writing manifest
success
Pulling model: llama3.1:latest
pulling manifest
pulling 8eeb52dfb3bb... 100% ▕#############################################▏ 4.7 GB
pulling 948af2743fc7... 100% ▕#############################################▏ 1.5 KB
pulling 0ba8f0e314b4... 100% ▕#############################################▏  12 KB
pulling 56bb8bd477a5... 100% ▕#############################################▏   96 B
pulling 1a4c3c319823... 100% ▕#############################################▏  485 B
verifying sha256 digest
writing manifest
success
dschmitz@SLY:~$
Conclusion
I know this tutorial was long, but I believe that it is a great learning experience in getting Linux-based GitHub projects running on your Windows machine. In addition, these types of activities are a fundamental building block for some of the future projects that I want to share with you. For example, I have planned some more advanced tutorials on the horizon that potentially involve installing and using Microsoft Visual Studio Code (VS Code) to manipulate Python for API calls and such.
P.S. I almost forgot, if you want to pretend you are Tony Stark talking with Jarvis, click the Headphones icon (labeled Call next to where you type in your message), and to start having an interactive conversation with the LLM. 😊
Next up: Building your AI playground (Part 3) – VS Code and Python