I used ComfyUI and Qwen3-TTS (text-to-speech) to clone my own voice. It is a novel party trick, but some might wonder, why would someone want to do that? What is the real-world practical use case?
My answer: Demo video recording.
Background
For work, I record a lot of demo videos to educate customers, partners, and internal field employees how to use our product, or tout new features. Throughout the process, recording my voice is by far the most tedious part, especially when someone asks for changes to the video. To understand my pain, you have to understand my video creation process.
When I record my demo videos, I typically record the video and audio separately. The video is recorded first with Camtasia, a dialog script is written to clearly communicate what I want to say, then the audio is recorded separately with Audacity. This is great because it allows stakeholders to proofread the content, and lets me use Audacity’s noise reduction features to polish the final sound to be crystal clear.
The problem occurs when someone watches the video and says, “Can you edit this sentence or change these few words?” Now, if I re-record just the requested tweak, it almost always sounds different from the original recording, and is distracting for viewers. There is just something about recording audio the next day that sounds different. So, for consistency, I sometimes find it is easier just to re-record the whole audio track from scratch.
This is where the voice cloning comes in handy. If you use a text-to-speech model and clone your own voice, it never “sounds different the next day”. You can have it redo a single sentence, and it doesn’t have that unexpected variability like a normal human voice does.
In a nutshell, this saves a lot of time simply by adding consistency, and not having to re-record the audio manually. (Note: A side-by-side comparison of my original audio, versus a clone of the same passages, can be found at the bottom of this page.)
So, for this blog, I am going to attempt to walk you through the steps I did to clone my own voice.
Creating my voice sample
First, I needed a high-quality sample of my own voice. It needed to be clear, free from background noise, and stored in a lossless format like a WAV file. I had Perplexity find some passages that include all the different phonetics, as well as some technical terms for variety. Here is what it suggested:
When the sunlight strikes raindrops in the air, they act as a prism and form a rainbow. The rainbow is a division of white light into many beautiful colors. These take the shape of a long round arch, with its path high above, and its two ends apparently beyond the horizon. There is, according to legend, a boiling pot of gold at one end. People look, but no one ever finds it. When a man looks for something beyond his reach, his friends say he is looking for the pot of gold at the end of the rainbow.
Perplexity even suggested adding some “technical tutorial wording” phrases (since that is the intended purpose).
To begin, navigate to the primary dashboard and select the configuration icon located in the upper-right corner. You’ll notice a variety of parameters, including throughput latency, asynchronous data streams, and encrypted protocols. By adjusting the slider to 180°, the system recalibrates the aesthetic interface. It’s a seamless integration that leverages high-performance GPU acceleration, specifically optimized for the RTX 5090 architecture. Once the initialization is complete, click ‘Execute’ to finalize the deployment.
The key here is to record your voice in exactly the tone you want it to clone. You want it to sound excited? You need to record the passage with your excited voice.
I recorded both the passages into a single clip with Audacity. Here are my recording tips:
- Record with the mic 4-5″ from your mouth
- The first 10 seconds of the recording should just be ambient noise from the room (don’t even breath into the mic)
- When finished recording, select the first 10 seconds, then click Effect > Noise Removal and Repair > Noise Reduction > Get noise profile, CTRL-A to select the whole track, Effect > Noise Removal and Repair > Noise Reduction > OK. (Do this TWICE)
- With the whole track still selected, click Effect > Volume and Compression > Normalize. The default is -1.0, but I typically normalize the peak amplitude to -3.0 dB
- Save as a WAV file, 48000 Hz, 24-bit, mono
Installing ComfyUI
Next, I installed ComfyUI, and used the Windows Portable version.
Side Note: I tried to get everything working with the ComfyUI native Windows desktop app, but I had all sorts of technical difficulties. After troubleshooting for a while, Perplexity actually suggested I try the portable version instead.
To begin, I extract that 7zip ComfyUI download to the C:\ComfyUI_windows_portable\ directory.
Open a command prompt (with administrator rights), and CD into that directory to run the “run_nvidia_gpu.bat” to do the first-time initialization tasks.
On first run, I noticed “NVIDIA GeForce RTX 5090 with CUDA capability sm_120 is not compatible with the current PyTorch installation.” i.e. The version of PyTorch that came bundled wasn’t a high enough version to work with my newer Blackwell GPU.
Close down ComfyUI be pressing CTRL-C, press “Y” to terminate the batch job in the command window, and then close the browser.
Upgrading PyTorch and CUDA
Here are the commands I used to upgrade PyTorch, CUDA, and then test:
(Make sure you run these from within the ComfyUI_windows_portable directory.)
C:\ComfyUI_windows_portable>.\python_embeded\python.exe -m pip uninstall -y torch torchvision torchaudio
Found existing installation: torch 2.10.0+cu126
Uninstalling torch-2.10.0+cu126:
  Successfully uninstalled torch-2.10.0+cu126
Found existing installation: torchvision 0.25.0+cu126
Uninstalling torchvision-0.25.0+cu126:
  Successfully uninstalled torchvision-0.25.0+cu126
Found existing installation: torchaudio 2.10.0+cu126
Uninstalling torchaudio-2.10.0+cu126:
  Successfully uninstalled torchaudio-2.10.0+cu126

C:\ComfyUI_windows_portable>.\python_embeded\python.exe -m pip install torch torchvision torchaudio --index-url https://download.pytorch.org/whl/cu128
Looking in indexes: https://download.pytorch.org/whl/cu128
Collecting torch
  Using cached https://download.pytorch.org/whl/cu128/torch-2.10.0%2Bcu128-cp312-cp312-win_amd64.whl.metadata (29 kB)
Collecting torchvision
  Using cached https://download-r2.pytorch.org/whl/cu128/torchvision-0.25.0%2Bcu128-cp312-cp312-win_amd64.whl.metadata (5.5 kB)
Collecting torchaudio
  Using cached https://download-r2.pytorch.org/whl/cu128/torchaudio-2.10.0%2Bcu128-cp312-cp312-win_amd64.whl.metadata (7.1 kB)
... [Abbreviated output] ...
Using cached https://download.pytorch.org/whl/cu128/torch-2.10.0%2Bcu128-cp312-cp312-win_amd64.whl (2867.4 MB)
Using cached https://download-r2.pytorch.org/whl/cu128/torchvision-0.25.0%2Bcu128-cp312-cp312-win_amd64.whl (9.6 MB)
Using cached https://download-r2.pytorch.org/whl/cu128/torchaudio-2.10.0%2Bcu128-cp312-cp312-win_amd64.whl (2.0 MB)
Installing collected packages: torch, torchvision, torchaudio
   ━━━━━━━━━━━━━━━━━━━━━━━━━━━━━━━━━━━━━━━━ 0/3 [torch]  WARNING: The scripts torchfrtrace.exe and torchrun.exe are installed in 'C:\ComfyUI_windows_portable\python_embeded\Scripts' which is not on PATH.
  Consider adding this directory to PATH or, if you prefer to suppress this warning, use --no-warn-script-location.
Successfully installed torch-2.10.0+cu128 torchaudio-2.10.0+cu128 torchvision-0.25.0+cu128

C:\ComfyUI_windows_portable>.\python_embeded\python.exe -c "import torch; print(torch.__version__); print(torch.version.cuda); print(torch.cuda.get_device_name(0))"
2.10.0+cu128
12.8
NVIDIA GeForce RTX 5090
If this was successful, the last command should output the latest CUDA versions and the correct model name for your GPU.
Launch ComfyUI again with run_nvidia_gpu.bat. Watch the startup output, and make sure it is identifying your GPU correctly. Once you have verified it is using your GPU, close down the program again so that you can install more add-ons.
Adding ComfyUI Custom Nodes (plug-ins)
Next, let’s add the Comfy-UI Manager (for convenience). This is a handy plug-in that helps to load modules in ComfyUI. (We don’t really need to install it because we are going to do everything from the command line, but it may come in handy for other things in the future.)
C:\ComfyUI_windows_portable>cd /d C:\ComfyUI_windows_portable\ComfyUI\custom_nodes
C:\ComfyUI_windows_portable\ComfyUI\custom_nodes>git clone https://github.com/ltdrdata/ComfyUI-Manager.git
Cloning into 'ComfyUI-Manager'…
remote: Enumerating objects: 29182, done.
remote: Counting objects: 100% (23/23), done.
remote: Compressing objects: 100% (23/23), done.
remote: Total 29182 (delta 5), reused 6 (delta 0), pack-reused 29159 (from 1)
Receiving objects: 100% (29182/29182), 153.86 MiB | 28.14 MiB/s, done.
Resolving deltas: 100% (21665/21665), done.
Next let’s add some packages. The first is the Qwen3 text-to-speech, followed by installing the requirements, and updating the tokenizer:
C:\ComfyUI_windows_portable\ComfyUI\custom_nodes>git clone https://github.com/1038lab/ComfyUI-QwenTTS.git
Cloning into 'ComfyUI-QwenTTS'...
remote: Enumerating objects: 251, done.
remote: Counting objects: 100% (49/49), done.
remote: Compressing objects: 100% (41/41), done.
remote: Total 251 (delta 33), reused 8 (delta 8), pack-reused 202 (from 2)
Receiving objects: 100% (251/251), 1.61 MiB | 5.95 MiB/s, done.
Resolving deltas: 100% (110/110), done.

C:\ComfyUI_windows_portable\ComfyUI\custom_nodes>cd ComfyUI-QwenTTS

C:\ComfyUI_windows_portable\ComfyUI\custom_nodes\ComfyUI-QwenTTS> ..\..\..\python_embeded\python.exe -m pip install -r requirements.txt
Collecting accelerate>=1.12.0 (from -r requirements.txt (line 1))
  Using cached accelerate-1.13.0-py3-none-any.whl.metadata (19 kB)
Requirement already satisfied: einops>=0.8.1 in C:\ComfyUI_windows_portable\python_embeded\Lib\site-packages (from -r requirements.txt (line 2)) (0.8.2)
Requirement already satisfied: huggingface_hub in C:\ComfyUI_windows_portable\python_embeded\Lib\site-packages (from -r requirements.txt (line 3)) (1.6.0)
Collecting librosa>=0.11.0 (from -r requirements.txt (line 4))
  Using cached librosa-0.11.0-py3-none-any.whl.metadata (8.7 kB)
... [Abbreviated output] ...
Successfully installed accelerate-1.13.0 audioread-3.1.0 decorator-5.2.1 joblib-1.5.3 lazy_loader-0.5 librosa-0.11.0 llvmlite-0.46.0 more-itertools-10.8.0 msgpack-1.1.2 numba-0.64.0 openai-whisper-20250625 platformdirs-4.9.4 pooch-1.9.0 scikit-learn-1.8.0 soundfile-0.13.1 soxr-1.0.0 threadpoolctl-3.6.0 tiktoken-0.12.0

C:\ComfyUI_windows_portable\ComfyUI\custom_nodes\ComfyUI-QwenTTS>cd ..\..\..

C:\ComfyUI_windows_portable>.\python_embeded\python.exe -m pip install "qwen-tts==0.1.1"
Collecting qwen-tts==0.1.1
  Using cached qwen_tts-0.1.1-py3-none-any.whl.metadata (61 kB)
Collecting transformers==4.57.3 (from qwen-tts==0.1.1)
  Using cached transformers-4.57.3-py3-none-any.whl.metadata (43 kB)
Collecting accelerate==1.12.0 (from qwen-tts==0.1.1)
  Using cached accelerate-1.12.0-py3-none-any.whl.metadata (19 kB)
Collecting gradio (from qwen-tts==0.1.1)
  Using cached gradio-6.9.0-py3-none-any.whl.metadata (16 kB)
... [Abbreviated output] ...
Successfully installed accelerate-1.12.0 brotli-1.2.0 fastapi-0.135.1 ffmpy-1.0.0 flatbuffers-25.12.19 gradio-6.9.0 gradio-client-2.3.0 groovy-0.1.2 huggingface_hub-0.36.2 onnxruntime-1.24.4 orjson-3.11.7 pandas-3.0.1 protobuf-7.34.1 pydub-0.25.1 python-dateutil-2.9.0.post0 python-multipart-0.0.22 pytz-2026.1.post1 qwen-tts-0.1.1 safehttpx-0.1.7 semantic-version-2.10.0 six-1.17.0 sox-1.5.0 starlette-0.52.1 tomlkit-0.13.3 transformers-4.57.3 tzdata-2025.3 uvicorn-0.42.0
This package installs, Voice Clone (QwenTTS) Advanced, Whisper STT (QwenTTS), TTS nodes, example workflows, as well as the last line installing a different versioned tokenizer.
Installing ffmpeg
Next, another prerequisite that isn’t called out anywhere, is that you need ffmpeg installed on your machine for Whisper to work. (Whisper transcribes your voice sample so that its text can be inputted as the reference.)
I downloaded the latest version of ffmpeg from gyan.dev, extracted it to C:\ffmpeg\, and added the C:\ffmpeg\bin directory to my system path.
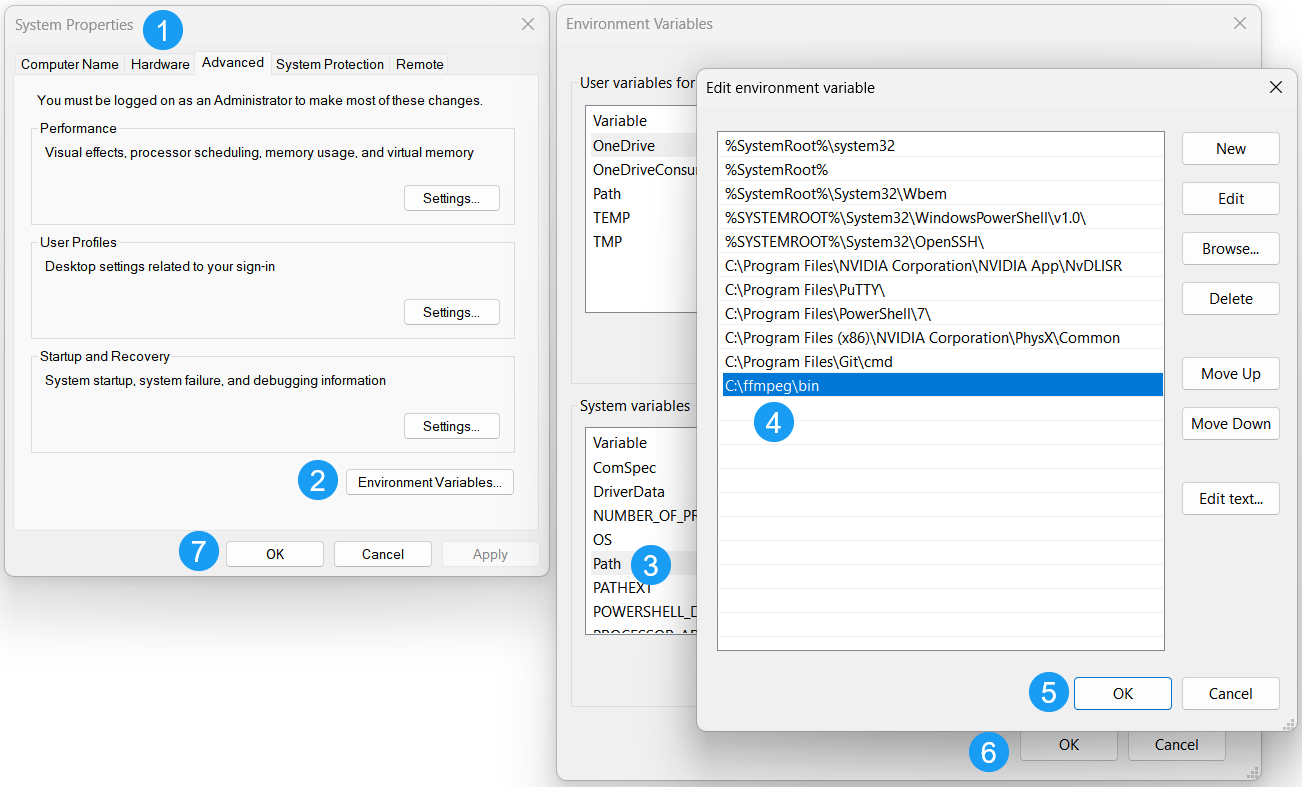
If you have done this correctly, you should be able to run the ffmpeg command from the command line:
C:\ComfyUI_windows_portable>ffmpeg -version
ffmpeg version 2026-03-18-git-106616f13d-full_build-www.gyan.dev Copyright (c) 2000-2026 the FFmpeg developers
built with gcc 15.2.0 (Rev11, Built by MSYS2 project)
configuration: --enable-gpl --enable-version3 --enable-static --disable-w32threads --disable-autodetect --enable-cairo
... [Abbreviated output] ...
--enable-libopencore-amrnb --enable-libopus --enable-libspeex --enable-libvorbis --enable-ladspa --enable-libbs2b --enable-libflite --enable-libmysofa --enable-librubberband --enable-libsoxr --enable-chromaprint --enable-whisper
libavutil      60. 29.100 / 60. 29.100
libavcodec     62. 29.101 / 62. 29.101
libavformat    62. 13.101 / 62. 13.101
libavdevice    62.  4.100 / 62.  4.100
libavfilter    11. 15.101 / 11. 15.101
libswscale      9.  7.100 /  9.  7.100
libswresample   6.  4.100 /  6.  4.100

Exiting with exit code 0
Overriding the Torch Codec
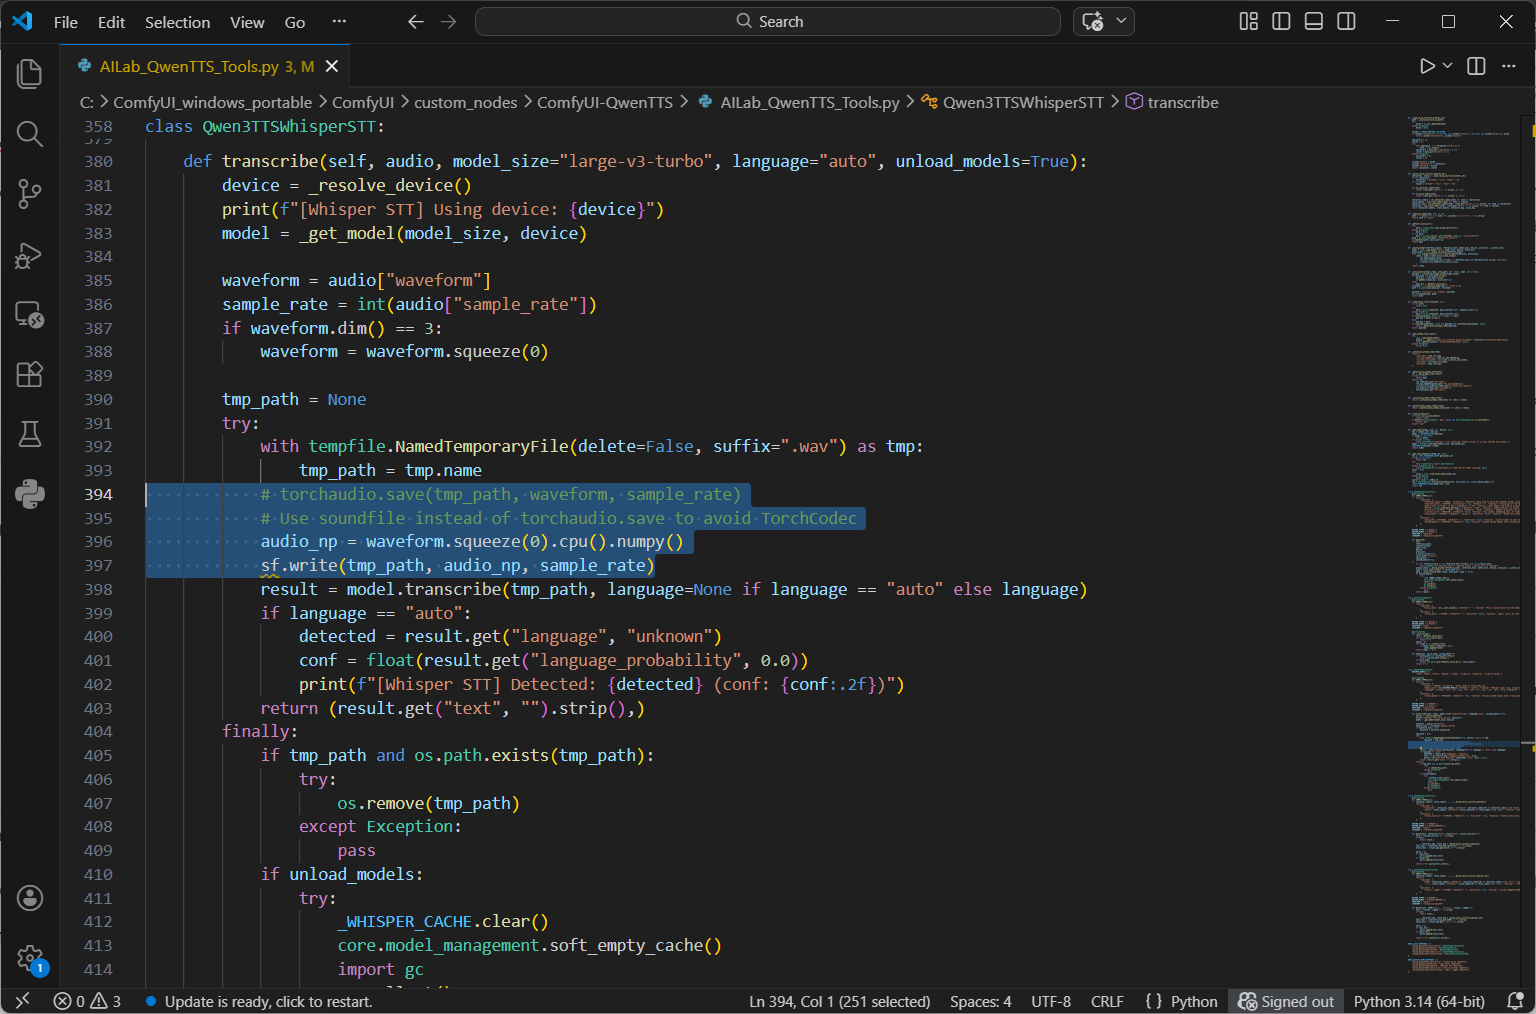
One last prerequisite is to override the Torch Codec because it isn’t compatible with the version of PyTorch we are running for our Blackwell GPU. Open the following python file with your favorite code editor (I use VS Code): C:\ComfyUI_windows_portable\ComfyUI\custom_nodes\ComfyUI-QwenTTS\AILab_QwenTTS_Tools.py
Make the following edits:
In the imports section at the top of the AILab_QwenTTS_Tools.py file, add the following line:

import soundfile as sf

Replace (or comment out):
# torchaudio.save(tmp_path, waveform, sample_rate)

With:
# Use soundfile instead of torchaudio.save to avoid TorchCodec
audio_np = waveform.squeeze(0).cpu().numpy()
sf.write(tmp_path, audio_np, sample_rate)
When done, save the python file. The “def transcribe” function should look like this:
Now open ComfyUI again by running C:\ComfyUI_windows_portable\run_nvidia_gpu.bat
This may take a little bit for it to download and install any items before the UI is fully ready.
Adding the workflow
You should now have a blank canvas in front of you, and we can import the workflow.
From the left navigation click the ComfyUI menu (the stylized “C” logo) > File > Open.
Open the C:\ComfyUI_windows_portable\ComfyUI\custom_nodes\ComfyUI-QwenTTS\example_workflows\Voice_Clone.json
You should now see the new workflows added like this:
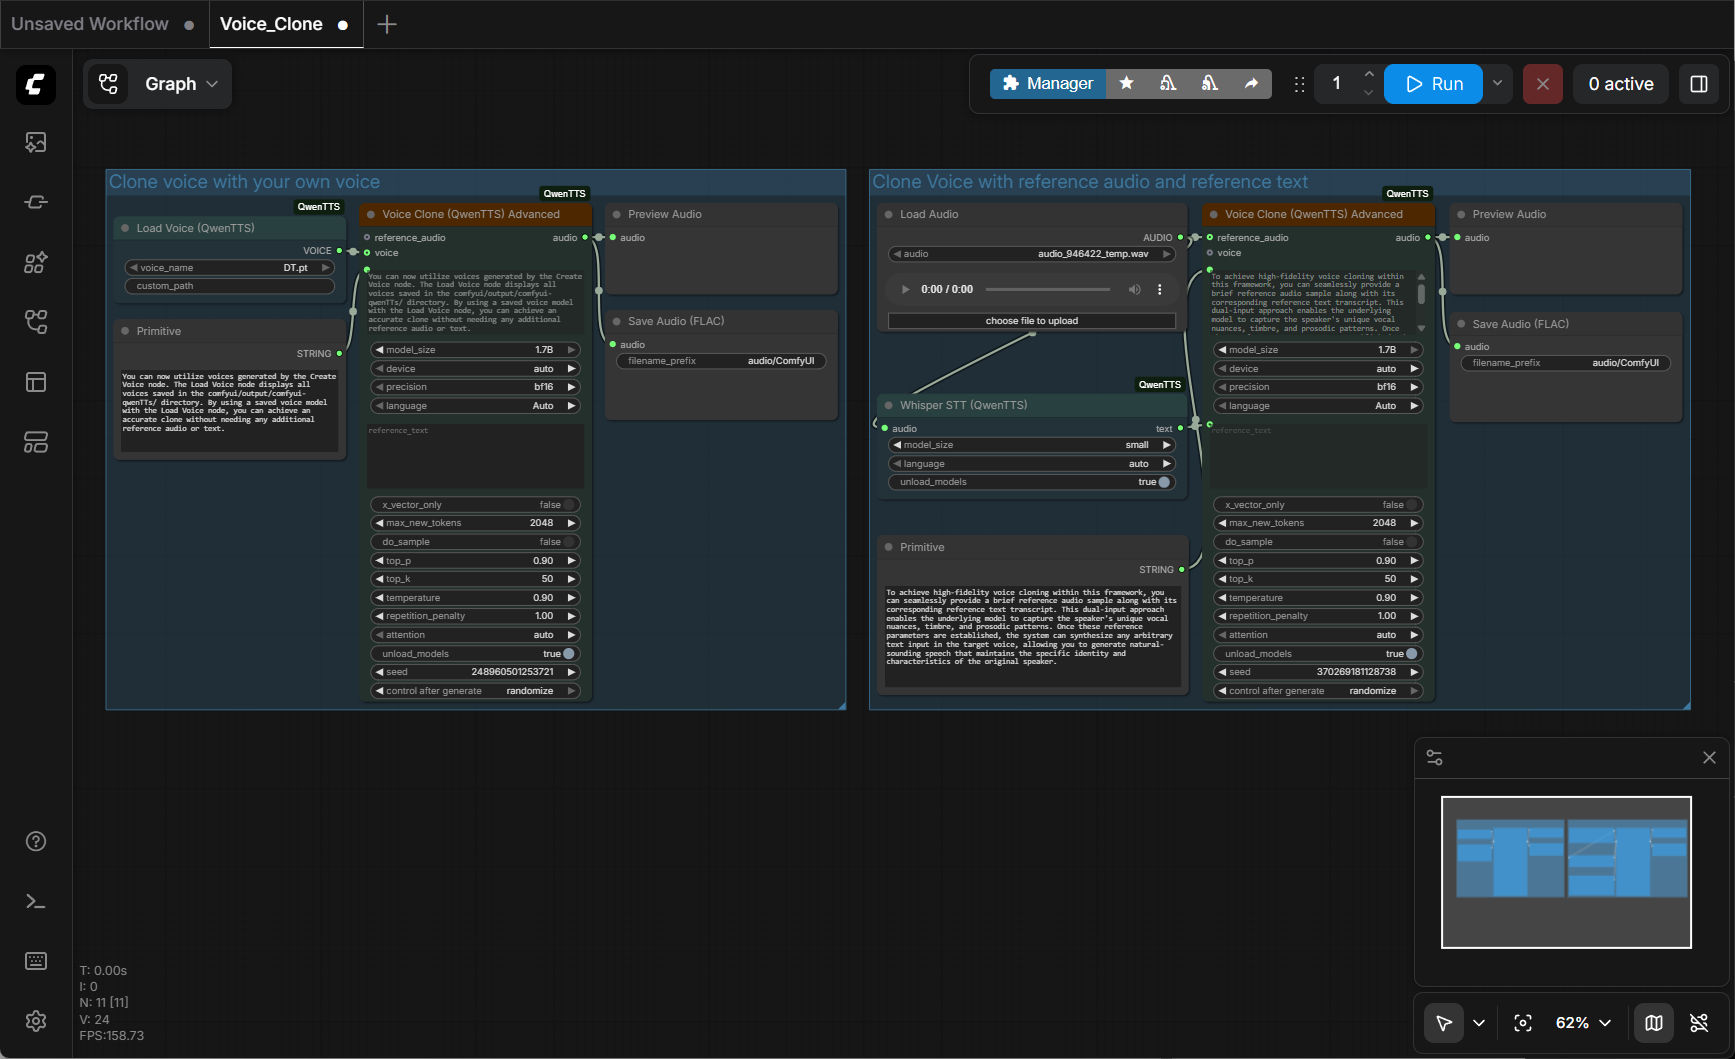
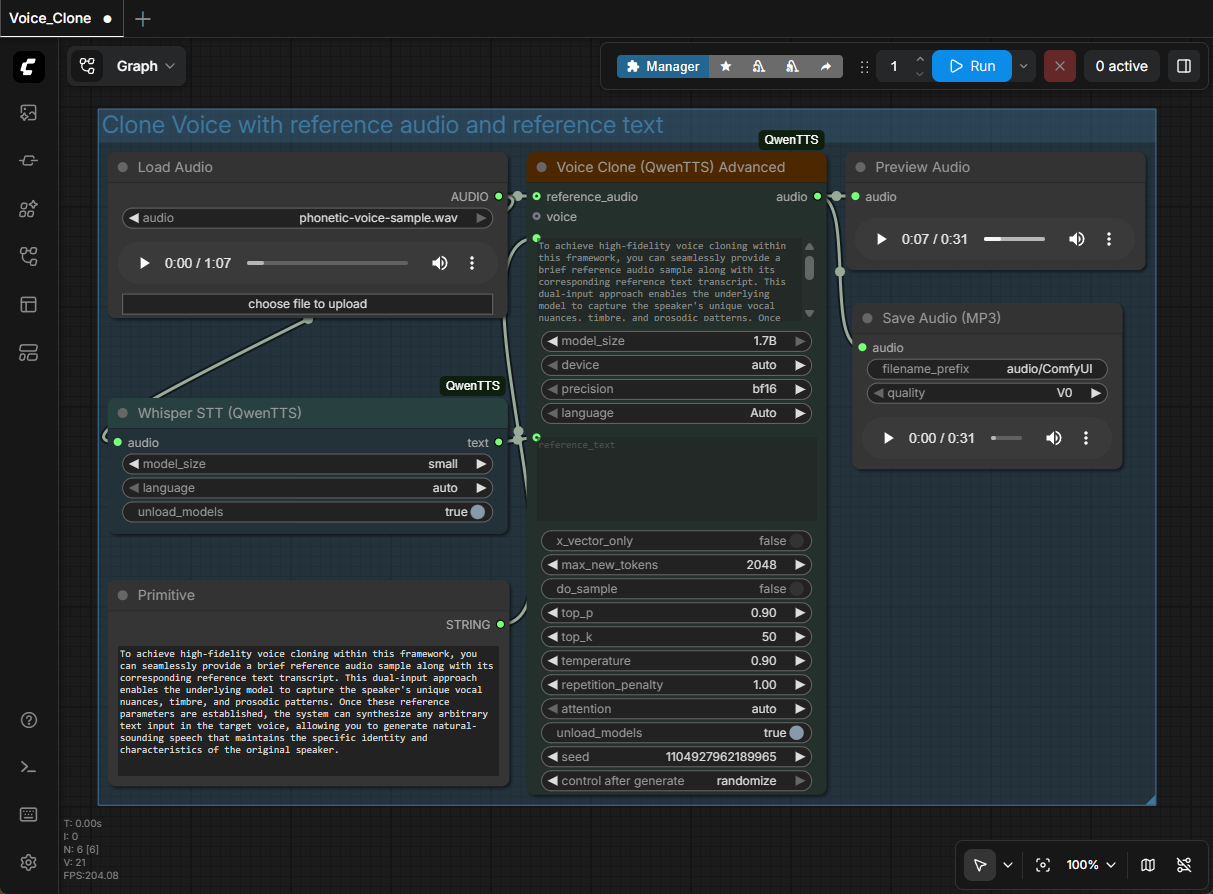
I didn’t use the workflow on the left (“Clone voice with your own voice”), so I deleted it. The remaining workflow is named, “Clone Voice with reference audio and reference text”, and that is were I configured my settings:
Configuring the workflow settings
For the Load Audio node, I chose my voice sample. (I named my sample, “phonetic-voice-sample.wav”.)
By default, this workflow outputs in the .flac audio format. Since Camtasia doesn’t accept that audio file type, I added a new “Save Audio (MP3)” node.
To do this, I right clicked within the workflow canvas, selected Add Node > audio > Save Audio (MP3)
I then dragged the connector wire from the Voice Clone (QwenTTS) Advanced – audio to the Save Audio (MP3), and then deleted the Save Audio (FLAC) node. (See screenshot below)
In the Primitive node, add any text that you want to generate.
At this point, depending on your video card, you may also need to tweak Whisper model_size to small/base/tiny, or set the QwenTTS model_size to 0.6B parameters (though bigger is better). Note that when I ran this workflow, my GPU used between 14-16 GB of the dedicated VRAM, so you may need to adjust the model size if your GPU has less available.
At last, you can finally click on the blue Run button to start the workflow. Be patient because the first time this is run, it will need to download the model files (~4.25 GB) from the internet.
Now, here is where the rubber meets the road. There is a high probability that your machine will be lacking some sort of library, or requirement, that causes the workflow to error out. This is where Perplexity (or any frontier model like ChatGPT, Claude, or Gemini) can come in handy. Start a new troubleshooting thread with it, tell it what you are trying to accomplish, enable a longer “thinking” mode (like if you subscribe to Perplexity Pro as I do), paste in the error, and work through its advice. Keep pasting in error messages until it gets it right. 🙂
Once the workflow is finally running, you can simply paste any text into the Primitive dialog box, click Run, and in a few short minutes the mp3 file is ready. You can even use the Preview Audio node’s play button to listen before downloading, or even adjust the mp3 quality in the Save Audio (MP3) before saving the file to your local drive.
Here is a direct comparison of my original recording, to a generated version of the original text. To me, there are only slight differences in intonation between me and the computer, but you be the judge!
Conclusion
In conclusion, ComfyUI is a great tool for running generative models. If you feel adventurous, you can click on the Templates button in the left navigation menu to generate images, image to video, text to video, generate 3D models and more. The key learning point that I would like to stress, is that you “can use AI to help you learn AI”. The frontier models are really good at helping you solve problems or even learn new things.